Sharing Jupyter Notebooks using GitHub
Overview
Teaching: 10 min
Exercises: 20 minQuestions
How can I share my work outside of publishing in a traditional journal?
How can I use GitHub for sharing Jupyter notebooks online?
Objectives
Create a repository on GitHub to share your Jupyter Notebook online.
Describe the features GitHub provides that enhance its utility for online sharing.
Describe GitHub’s limitations for sharing Jupyter Notebooks.
Important notice
This lesson has been taken from https://reproducible-science-curriculum.github.io/sharing-RR-Jupyter/ and is distributed under the Creative Commons Attribution license. The following is a human-readable summary of (and not a substitute for) the full legal text of the CC BY 4.0 license.
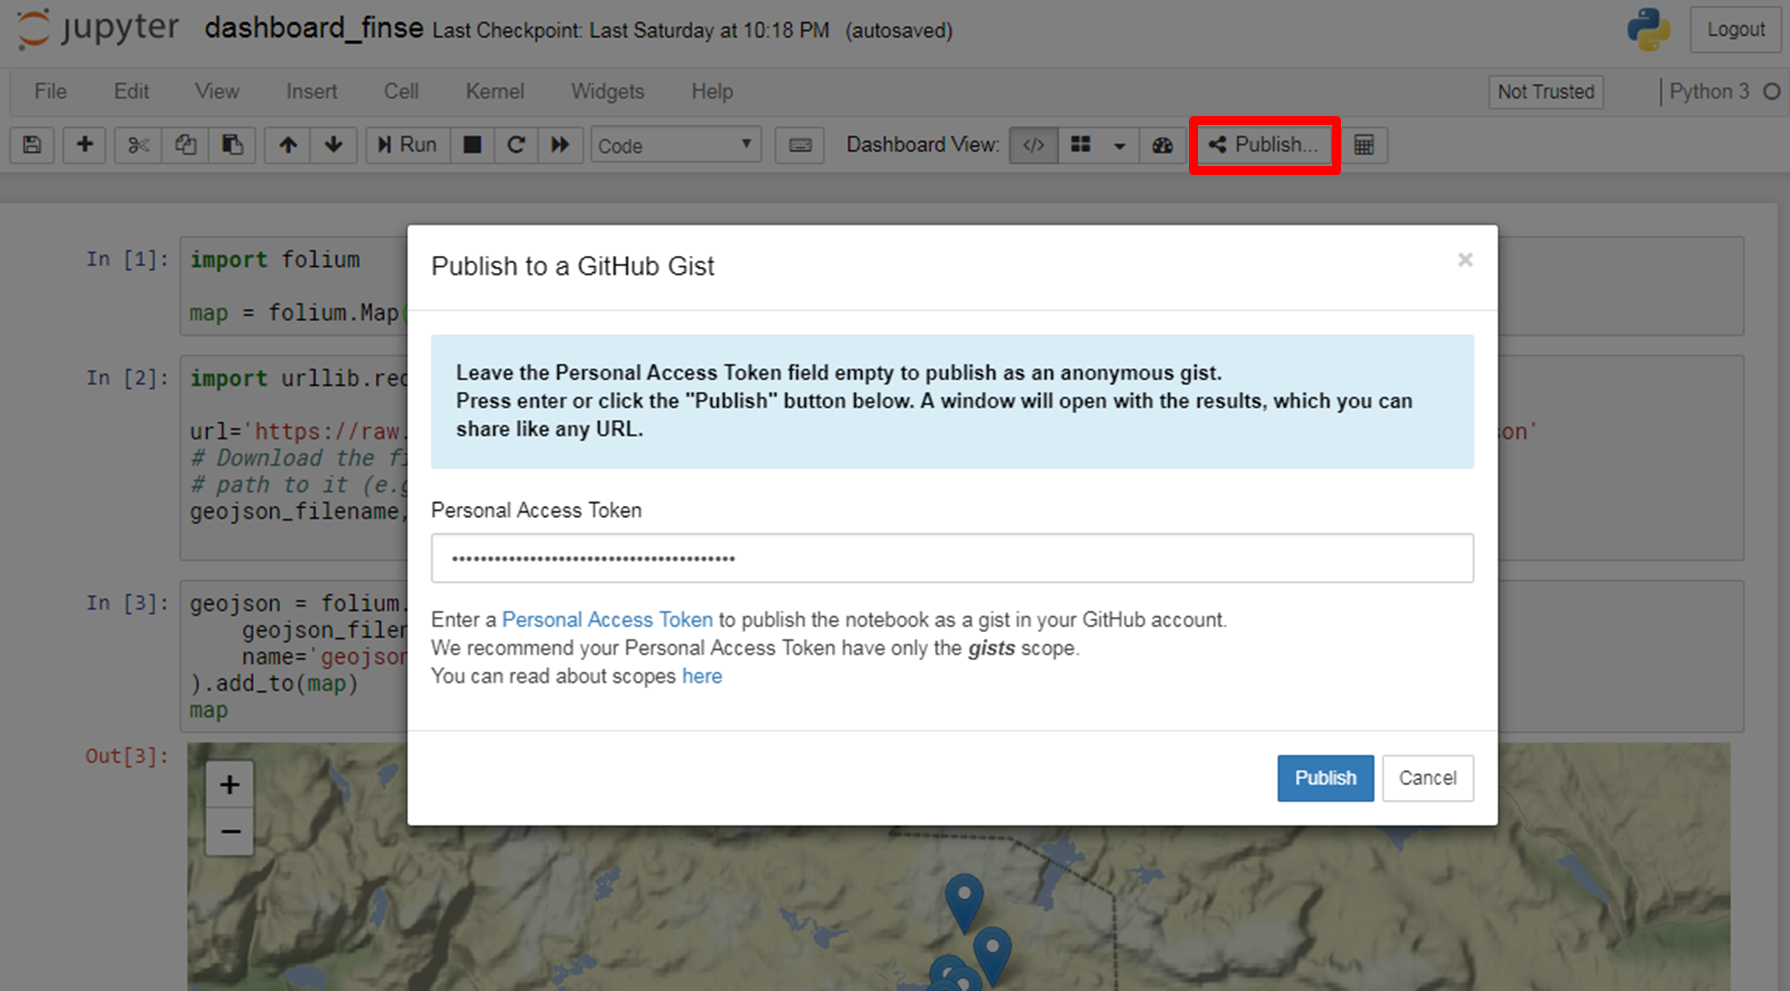
Publishing to Github Gist
- Launch Jupyter dashboard (either from
Anaconda Navigatoror from the command line). - Execute the entire jupyter dashboard (Kernel –> Restart & Run All) to make sure your dashboard is publishable
- Click on
Publish...(see image below):- if you leave the Personal Access Token field empty then your dashboard is published as an anonymous gist (and can’t be deleted)
- If you don’t want to publish your dashboard as an anonymous gist, you need to use your github account:
- Login to your Github account
- Go back to your jupyter notebook and click again on
Publish...but this time don’t leave empty the fieldPersonal Access Token. If you don’t have aPersonal Access Tokenyet, click onPersonal Access Tokento create a new one (Personal access tokens function like ordinary OAuth access tokens so keep it secret!) - Enter your
Personal Access TokenandPublish
Share your jupyter dashboards online using Github
In this lesson we will learn:
- How to create a new project repository on Github. A repository is a central location where source code and data is stored and managed
- How to add a file to the repository using GitHub’s web interface
- How to visually confirm that files have been added to the repository and preview files using the GitHub interface
- The concepts of creating a public repository for the purpose of sharing your research data
GitHub
GitHub is a development platform where we “can host and review code, manage projects, and build software.” GitHub hosts source code for 75+ million projects including the pandas package we have been using among many others.
Make sure you have a (free) account otherwise follow our setup instructions.
1. Create a new repository
- Click on Start a project as shown below.
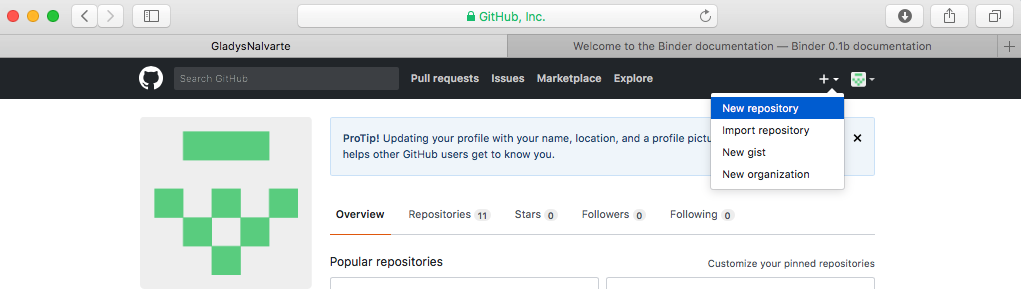
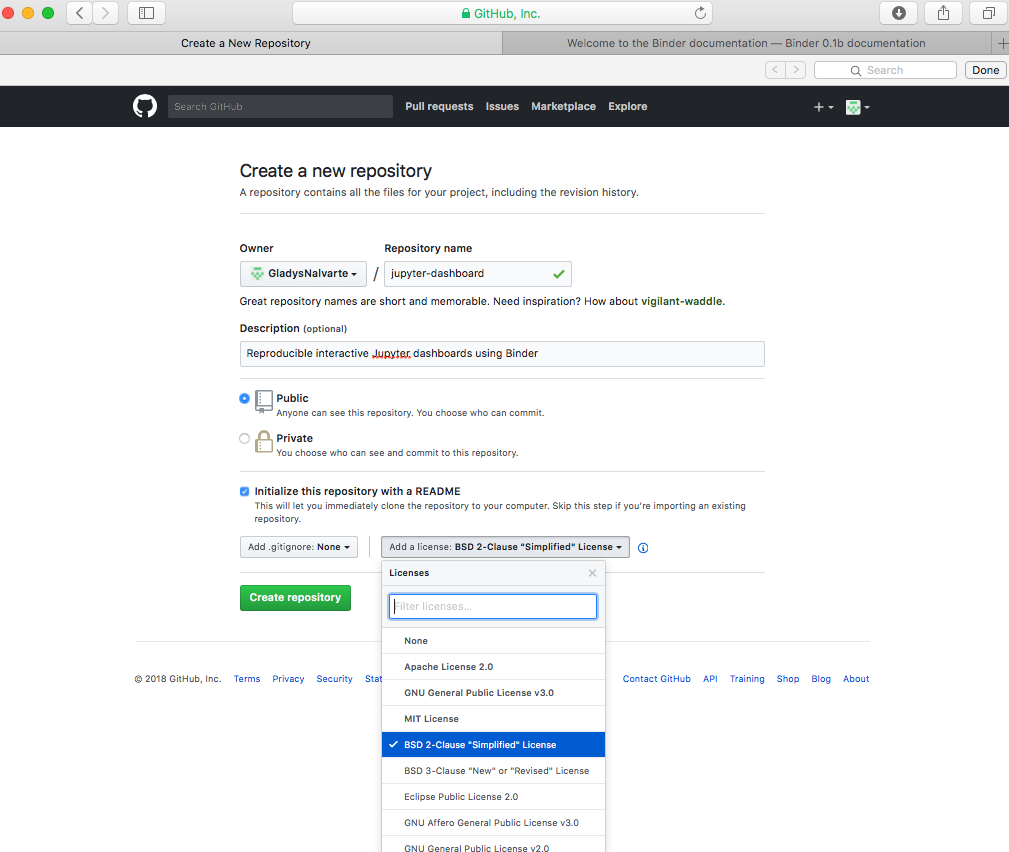
Create a new repository:
- Add a repository name. We choose to name our repository
jupyter-dashboard.- Personal GitHub accounts require that projects be public.
- Check the Initialize this repository with a README option.
- Add a license (for instance BSD 2-Clause “Simplified” License or BSD 3-Clause or MIT license)
- Click the green Create repository button.
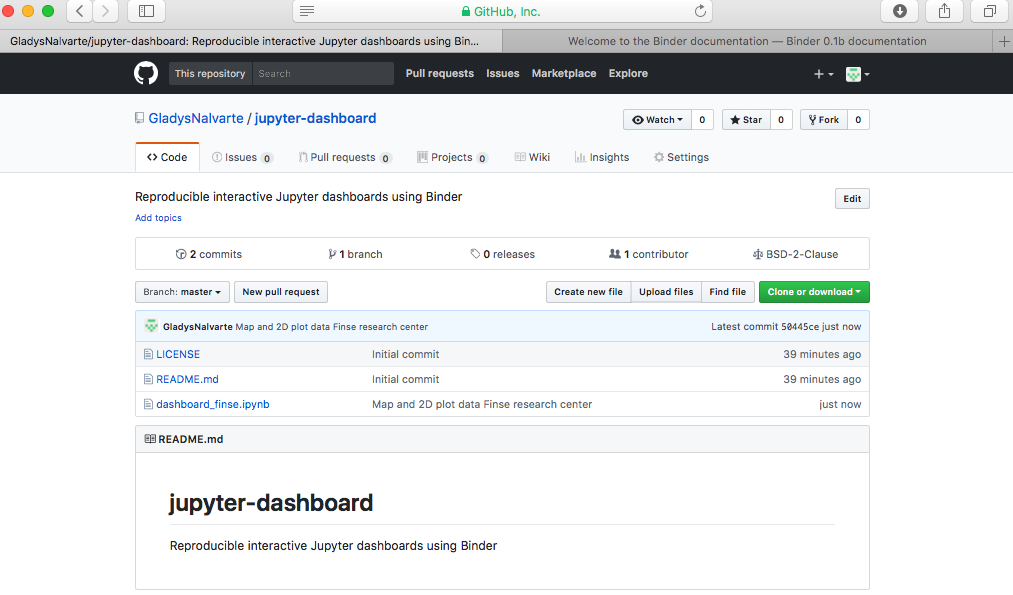
Congratulations!! We now have created our repository for hosting our jupyter dashboards!
2. Upload our previous working notebook to the repository
In anticipation of our next lesson on sharing using the capability of Binder, we need to upload the notebook that we have been working on.
In our new repository, we will click on the Upload file button as shown below.

Upload our file:
- Drag and drop the data analysis notebook completed in the previous lesson or click the choose your files link to select the notebook.
- We will see any files that we have uploaded at the bottom of the drag and drop area.
- Add a message describing the change we are about to make.
- Typing “Map and 2D plot data Finse research center” in the subject field.
- We can either add the same message below in the extended description or leave it blank.
- Click on Commit changes button to complete the upload.
After commiting the change we should see that there are now three files in the repository: 1) the README and 2) the LICENSE and 3) our dashboard_finse.
Authoring & Citation
In addition to LICENSE, it is recommended to add:
- AUTHORS: file containing the list of contributors
- CITATION: file containing information on how to cite your work, including a DOI (Digital Object Identifier)
List of authors
A GitHub repository is very often created by an individual user so adding the list of authors is very important.
Add a new file AUTHORS in your repository
- Go to your repository in your web browser
- Click on “Create new file” and name your file
AUTHORS- Add the list of authors/contributors and commit your changes
Make your GitHub repository citable (DOI)
Your GitHub repository contains your scientific workflow, your programs/software, datasets (or links to your datasets) and jupyter dashboards so it is important to make the work you share on GitHub citable by archiving your GitHub repository to get a DOI. You may have a Data archive in your University or you may use the data archiving tool Zenodo.
Login to Zenodo
- Go to https://zenodo.org/ and click on
Log in(notSign up) - Choose
Log in with GitHub
- Zenodo will redirect you back to GitHub and ask you to give Zenodo the permissions it needs. click
Authorize Application:

Source: https://guides.github.com/activities/citable-code/zenodo-authorize.png
Get a DOI for your Github repository
- When sucessfully login to Zenodo, click on your username (top right) and select
GitHub
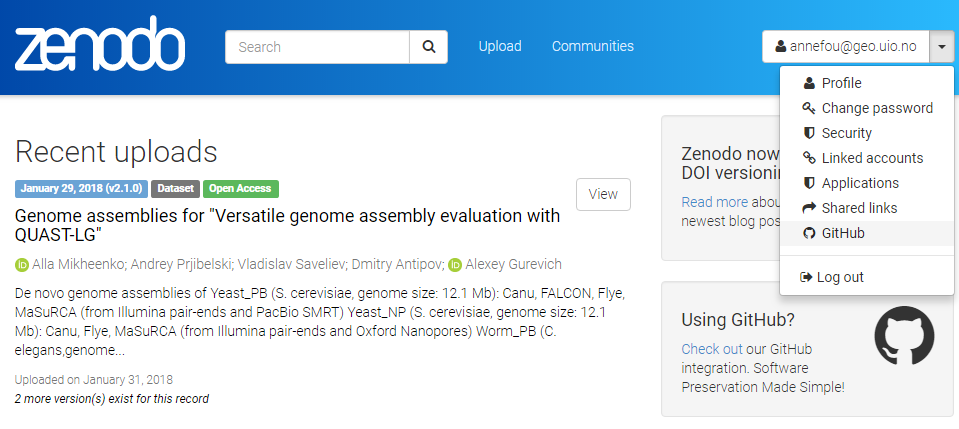
Then
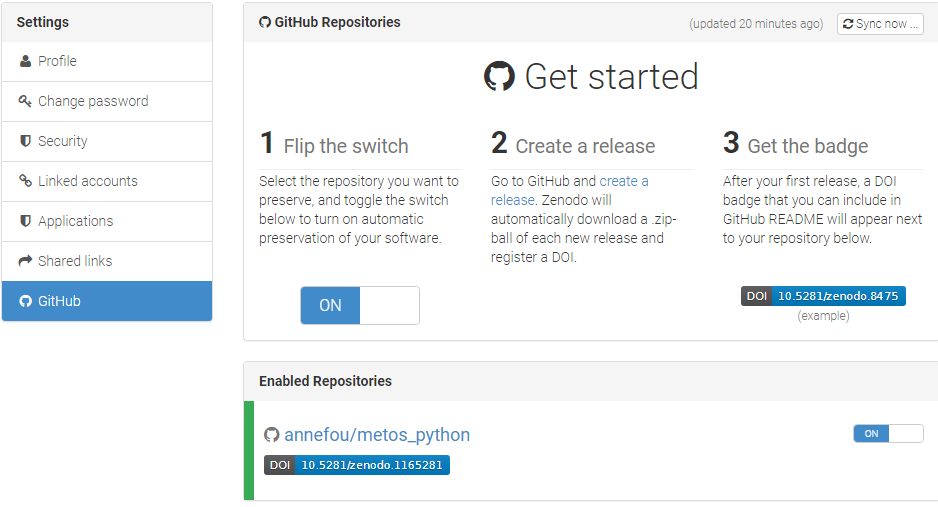
- Select the repository
sharing-githuband flip the switch toon - Create a Release on Github
- Then go to your GitHub repository and click on
settingsand selectWebhooks
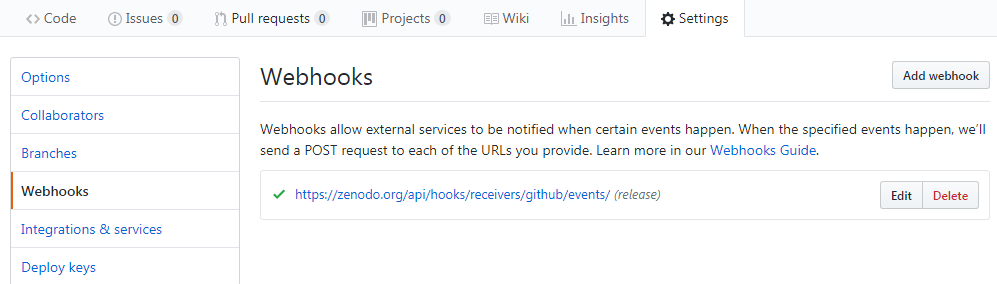
Your GitHub repository is now linked to Zenodo and you will automatically get a DOI:
Add your DOI to your GitHub repository
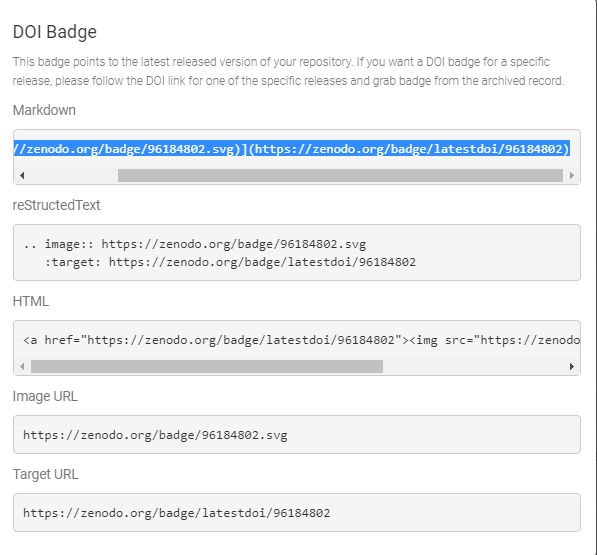
- Get your DOI badge on Zenodo and copy your DOI information (selection markdown)
- Go to your GitHub repository and edit your README file to add your DOI
- Create a new file CITATION in your GitHub repository and show how to cite your reprository with your DOI
Limitations
Sharing your GitHub repository along with your jupyter notebooks/dashboards is an important step for making your research reproducible. However, anyone willing to rerun your programs/dashboards/notebooks need to get the same computational environment (python, additional python packages, etc.).
The next section (using Binder) will show you how to make your research fully reproducible, offering users the same computational environment with no efforts.
Where to find more about GitHub
To learn more about GitHub you can review one or more of these additional (external) resources:
- GitHub Guide - Hello World
- All the GitHub guides
- Hubspot
gitand GitHub tutorial- Plurlsight’s GitHub beginner’s guide
- Code School’s GitHub tutorial
More about Git version control
If you would like to learn about source code version control using the
gitsoftware, thegitin GitHub, please see these resources:
- Try this 15 minute interactive
gittutorial- Try some additional
gitexercises here
Key Points
GitHub is a development platform where we “can host and review code, manage projects, and build software.”
A GitHub repository can be created, populated, and shared without command line or other special-purpose version control tools.
Jupyter Notebooks shared through GitHub are rendered, but are static. GitHub does not run the notebook(s) in a repository.